
 Methods for Creating High-Quality Custom Apparel with Direct-to-Film Transfers
  How SASE Solutions Empower Productive Workforces in a Digital Era
  Excel vs PDF: Which Dominates Document Sharing in 2025? (Data-Driven Comparison)
  TitaniumInvest.com Money 2024: AI‑Driven Tools Outperform Traditional Banking
  Why Your Link Building Efforts Might Fail
  How to Request or Give Remote Control in a FaceTime Call on iPhone
  The Rise of Intelligent Automation in Business Operations
  The Best Ideas for Designing Your Custom Printed Ring Binder
  How Technology is Changing the Way We Play Hearts
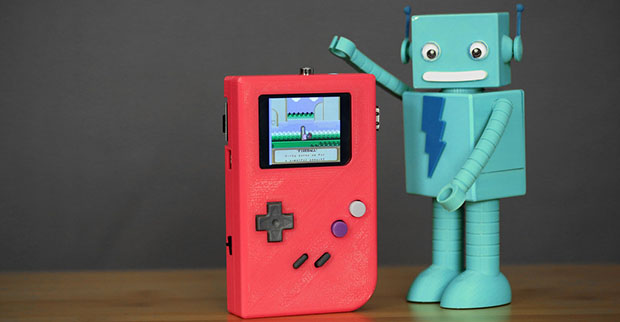
Game Boy made its debut in the early 90’s and grew in immense popularity on the global scale. It was the simply the best gaming bot for anyone at any age but in this modern age we had lost the age old technology. However modern DIY tools and technology powering the same gives us an opportunity to create our very own Game Boy by following simple instructions. This DIY instruction has been released by a popular DIY tech site called Adafruit which allows users to create a pocket sized Game Boy using just a 3D printer.
Everything you need is here
You will be required to use a Raspberry Pi computer in order to run an emulator for the Nintendo classics game. Adfruit website carefully provides the instructions to develop a DIY Game Bot with a Super Nintendo controller, system buttons and much more in its 3D printed case. Adfruit offers everything required for making the Gamebot with ‘Gamegirl’ DIY project and users get a taste of the rechargeable lithium ion battery. It is a big upgrade over the original Game Boy which used to run using the AA batteries but having lithium ion batteries means user will be able to charge their device just like a mobile phone and go on playing as much as they want. Another upgrade worth mentioning is that it has a SD card slot allowing users to upload and run as many games as possible.
Create, Play & Enjoy
Most of the DIY Projects make use of the Rapberry Pi Linux based computer as they are extremely cheap and can easily run a wide range of emulators without much hassle. For creating this classic gaming device users will be required to make use of the 3D printing and simple DIY electronics. The best thing about the 3D printing is that user can print this in their favorite color to lend a personalized effect. The 3D printed enclosure is designed to look just like classic Game Boy and it can easily house all the internal components.
The list of parts required to build the Game Boy includes Raspberry Pi Model B, PowerBoost 500, PiTFT Mini Kit, Micro Lip Charger, GPIO Pi Cable, SNES Controller, Power Slide Switch and 2200 mAh lithium cylindrical battery. The tools and supplies required for building bot includes a 3D printer, soldering iron, solder, Fun Tac, Putty, Wire Strippers, Cutters, Panavise Jr. and a Heat Shrink Pack.
Creating and developing a Game Boy following the instruction is quite easy and simple. Adfruit website provides well written guides for the users to build their very own Game Bot with ease and simplicity. The guides offered by this website focuses on the SD Card Setup, First Time Configuration, Network Set up as well as GPIO setup. This DIY Game Boy doesn’t feel any much different or absurd than the original creation rather it adds more features and functions which acts as valuable upgrades for the users.